Because I don’t really use Pinterest (except to make snarky joke boards about over-priced designer clothing) I’ve never paid much attention to the image-based marketing juggernaut. I put 90% of my social media efforts into Twitter and a lot of the things I publish aren’t particularly Pinterest-friendly. I mean, who’s going to pin an interview with a former stripper? Or a list of things that are annoying unless you’re the one doing them?
But I created several of my post series with the express purpose of publishing more Pinterest-worthy content. Pinterest loves fashion (like my Real Life Style Icon series) and food ( like Read // Eat and Kitchen Globetrotter) and pretty, travel-y stuff (Like the Mini Travel Guides). And then I proceeded to learn nothing about Pinterest.
It’s time for you to learn from my mistakes, friends. Let’s talk about editing the title text of your photos.
Here’s the deal.
When someone hovers over a photo on your blog and clicks that ‘Pin it!’ badge, the description box on Pinterest will auto fill based on the information you’ve provided. Of course, people can edit that info into something clever and helpful, but most of us are lazy and will just click ‘post.’
Which means if you didn’t fill in the title text on your image, someone just pinned a boring, poorly described image from your blog and not many people will feel moved to re-pin.
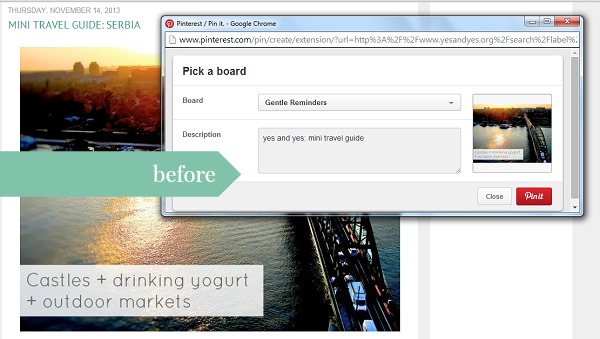
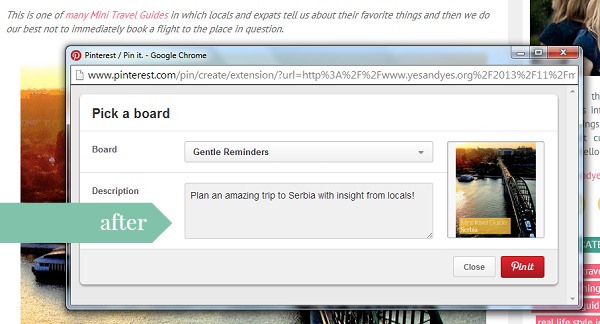
And here’s the great part: it’s insaaaanely easy to edit the title text on your photos.
Here’s how to edit these in Blogger:
1. Upload a pretty, Pinterest worthy photo (Here’s how to make images more Pinterest-friendly.)
2. Make sure you’ve saved the photo with an obvious, Google-friendly name. “Girl holding cheese” not “79340_hyl.jpg”
3. Right click on the photo, then click on ‘properties’

4. In the ‘title text’ box write something engaging and descriptive that would look good under a pin.
5. In the ‘alt text’ box describe the photo, again using obvious, Google-able terms. The alt text is helpful to assistive screen readers.
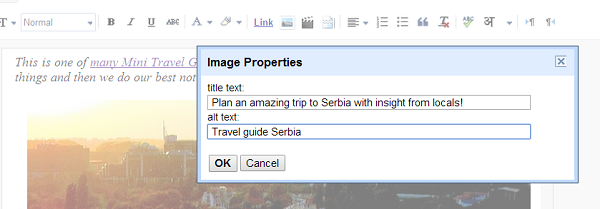
You can edit your title text in WordPress by editing the ‘Image Title Attribute’ under ‘Advanced Options.’
That’s it! Now people are about a million times* more likely to repin that content you worked so hard to create.
Now excuse me please, I’ve got to go back and edit every post ever.
(Just kidding!)
(mostly.)
What belated blogging epiphanies have you had? Share ’em in the comments!
*approximate estimation.





This is great Sarah!
I was just thinking to myself earlier this week that I need to figure out how to make my blog more Pinnable. This is incredibly helpful… I know have an evening activity to pursue.
Camila
So glad you found it useful! And did you see the link to the ‘How To Make Your Images More Pinnable’ post? That ish is game-changing!
I was always wondering how people did this. Thank you!
I just pinned this. Oh, the irony.
(but really…fantastic tip)
This is great advice! Don’t suppose you know how to do this in Squarespace? I can’t figure it out… thanks!
Sadly, no. 🙁 If you figure it out, let us know!
[…] of ideas by Entrepreneur.com. - If you’re going to Pin images from your blog, make sure to DO THIS first. - A PODCAST about creatives? I’m […]
Love this idea, and have just started doing it. I’m slowly making my way through the backlog of photos on my site and optimizing them, but a great (and easy) tool to use in the meantime is the ‘Smush It’ plugin — let’s you quickly ‘smoosh’ all your photo sizes right down so they load fast and don’t take up too much space. It’s quick and super useful (and can help improve your Google rank if you’ve got page speed issues). x